Apache Camel Interview Questions – Part3


Q) How can i read data from two different sources?

A) Data can be read from multiple sources in a camel route using poll-enrich EIP.


Q) Let’s say there is a camel route that sends data to an ActiveMQ queue and we want to remove some headers before sending it to the queue. How can we remove the headers?

A) Using removeHeader / removeHeaders syntax we can remove unwanted header(s) from the exchange.
Spring DSL:

<!-- remove a specific header called 'header1' -->
<removeHeader headerName="header1" />

<!-- removes a set of headers starting with 'CamelFile*' -->

<removeHeaders pattern="CamelFile*" />


Q) How do you print a header named ‘header1’ in the camel logs?

A) Syntax to print the header named header1 would be:

<log message="Value of header1 is $simple{header.header1}" />

Q) How do you print a property named ‘property1’ in the camel logs?

A) Syntax to print the property named property1 would be:

<log message="Value of property1 is $simple{property.property1}" />


Q) How can you print the exception if any present in the logs?

A) Syntax to print the exception message in the logs would be:

<log message="Exception occured while printing - ${exception.message}" />

Q) If we get the following exception while running/deploying the camel application, what is the course of action to be taken?

Caused by: org.apache.camel.ResolveEndpointFailedException: Failed to resolve endpoint: http://www.google.com due to: No component found with scheme: http

A) Need to add the camel component that understands http protocol i.e., add the jars of camel-http component.


Q) What are data transformations in camel?

A) Data transformations are provisions in camel to transform the data from one format in to another format. Following are the different ways to achieve the same:

  • Enterprise integration patterns – Message Translator & content enrich patterns
  • Transformation components – Using XML as starting point, JAXB, XStream and XSLT
  • File format transformation – Camel reads data formats such as CSV, JSON, ZIP, and GZIP to Java Objects and vice-versa
  • Template generation – Camel generates documents using template generation frameworks – velocity and freemarker
  • Data type transformation – a data structure should be transformed into a complex object.


Q) What are type converters in camel?

A) Using type converters one can convert the camel exchange payload from one type to another type. For e.g., we can easily convert a file object into a string as shown below.

<route>
  <from uri="file:src/data?fileName=input.txt&amp;noop=true" />
  <convertBodyTo type="java.lang.String" />
  <log message="Contents of file are $simple{in.body}" />
</route>


Apache Camel – Throughput or Performance Improvement while writing into files

Hi,


I bet that the example that i am going to share with you in this article is going to help you a lot.


A very common use case for a process would be to read from a file or to write into a file. If you are using a camel route for this purpose, you would notice that the file reading works perfectly fine but the file writing will take longer than what you’ve expected. Well that’s because when using the file component the IO operation is very expensive and in a production environment this means your application is expensive for the admin. A simple file writing process to generate a file with 0.1 million records would easily take around 10-15 mins.

In this example, i will try to explain the performance improvement of file writing by comparison technique. The comparison is between camel file component v/s camel aggregator v/s camel stream and finally we will which one is a best fit for performance improvement.

Let’s put these three options into our routes:


<?xml version="1.0" encoding="UTF-8"?>
<beans xmlns="http://www.springframework.org/schema/beans"
xmlns:xsi="http://www.w3.org/2001/XMLSchema-instance"
xmlns:camel="http://camel.apache.org/schema/spring"
xsi:schemaLocation="
http://www.springframework.org/schema/beans
http://www.springframework.org/schema/beans/spring-beans.xsd
http://camel.apache.org/schema/spring
http://camel.apache.org/schema/spring/camel-spring.xsd">

<bean id="shutdownInitiator" class="foo.beans.ShutdownInitiator" />
<bean id="counter" class="foo.beans.CounterIncrementer" />
<bean id="fileAggregationStrategy" class="foo.aggregator.FileAggregationStrategy" />

<camelContext xmlns="http://camel.apache.org/schema/spring">

<!-- Camel file writing using regular file component -->
<camel:route id="routeUsingFileComponent" autoStartup="false">
<camel:from uri="file:src/txt?fileName=LongFile1.txt&amp;noop=true" />
<camel:convertBodyTo type="java.lang.String" />
<camel:log message="${date:now:yyyy-MM-dd HH:mm:ss} File writing started..." />
<camel:split>
<camel:tokenize token="\r\n" />
<camel:bean ref="counter" />
<camel:to uri="file:src/txt1?fileName=ProcessedRecs.txt&amp;autoCreate=true&amp;fileExist=Append" />
</camel:split>
<camel:log message="${date:now:yyyy-MM-dd HH:mm:ss} File writing finished..." />
<camel:bean ref="shutdownInitiator" />
</camel:route>

<!-- camel route using aggregator -->
<camel:route id="routeUsingAggregator" autoStartup="false">
<camel:from uri="file:src/txt?fileName=LongFile1.txt&amp;noop=true" />
<camel:convertBodyTo type="java.lang.String" />
<camel:log message="${date:now:yyyy-MM-dd HH:mm:ss} File writing started..." />
<camel:split>
<camel:tokenize token="\r\n" />
<camel:bean ref="counter" />
<camel:aggregate strategyRef="fileAggregationStrategy" completionInterval="3000">
<camel:correlationExpression>
<camel:simple>${header.CamelFileName}</camel:simple>
</camel:correlationExpression>
<camel:to uri="file:src/txt1?fileName=ProcessedRecs.txt&amp;autoCreate=true&amp;fileExist=Append" />
</camel:aggregate>
</camel:split>
<camel:log message="${date:now:yyyy-MM-dd HH:mm:ss} File writing finished..." />
<camel:bean ref="shutdownInitiator" />
</camel:route>

<!-- camel route using camel stream -->
<camel:route id="routeUsingStream" autoStartup="false">
<camel:from uri="file:src/txt?fileName=LongFile1.txt&amp;noop=true" />
<camel:convertBodyTo type="java.lang.String" />
<camel:log message="${date:now:yyyy-MM-dd HH:mm:ss} File writing started..." />
<camel:split>
<camel:tokenize token="\r\n" />
<camel:bean ref="counter" />
<camel:to uri="stream:file?fileName=src/txt1/ProcessedRecs.txt" />
</camel:split>
<camel:log message="${date:now:yyyy-MM-dd HH:mm:ss} File writing finished..." />
<camel:bean ref="shutdownInitiator" />
</camel:route>
</camelContext>
</beans>
  1. The logic inside bean “counter”is simple. For every single record sent by the splitter EIP, it will prepend the date time to the string.
  2. The File aggregation strategy simply combines the old and new exchange.
  3. Finally the bean “shutdownInitiator” is a fancy way to tell my main class that the camel route execution is completed.

And the main class is a stand alone java code that will load my camel context and start the route i want to.


package foo;

import org.apache.camel.CamelContext;
import org.springframework.context.ApplicationContext;
import org.springframework.context.support.ClassPathXmlApplicationContext;

import foo.util.AppConstants;

public class MainApp {

public static void main(String[] args) throws Exception {
 ApplicationContext springContext = new ClassPathXmlApplicationContext("META-INF/spring/camel-context.xml");
 CamelContext context = springContext.getBean(CamelContext.class);

 context.start();
context.startRoute("routeUsingFileComponent");

 while(!AppConstants.shutdown) 
 Thread.sleep(1000);

 System.out.println("shutting down camel...");
 context.stop();

}

}

I have loaded all the routes but instructed the container not to start them. I will be executing the main class 3 times and each time i will starting a different route. The input file (LongFile1.txt) contains the 0.1 million lines.


So, here are the results from the log messages:

When the route “routeUsingFileComponent” is started, it took  28 mins (whoa..)

routeUsingFileComponent INFO 2016-07-10 02:09:50 File writing started…
routeUsingFileComponent INFO 2016-07-10 02:37:08 File writing finished…
shutting down camel…

Using the route “routeUsingAggregator”,  it took 46 seconds.

routeUsingAggregator INFO 2016-07-10 02:02:59 File writing started…
routeUsingAggregator INFO 2016-07-10 02:03:45 File writing finished…
shutting down camel…

And finally using the route “routeUsingStream”, it took 17 seconds.

routeUsingStream INFO 2016-07-10 02:07:01 File writing started…
routeUsingStream INFO 2016-07-10 02:07:18 File writing finished…
shutting down camel…


Finally the winner is: camel stream component which took around 17 seconds.


By fine tuning the completion interval for the aggregator in “routeUsingAggreator” we can still improve the performance but the point here is camel stream would do just fine without the need for an aggregator (you will have to provide an aggregation strategy, correlation expression, completion predicate)

Sure camel stream component is the winner but there are few disadvantages with this. Camel file component provides you a lot of options when writing into the files like force writing, setting permission on the file, etc which are not handy when it comes to the stream component. Finally it boils down to performance v/s integrity and of course the decision is always business driven.


References:

http://camel.apache.org/file2.html

http://camel.apache.org/stream.html

http://fabian-kostadinov.github.io/2016/01/10/reading-from-and-writing-to-files-in-apache-camel/

http://www.catify.com/2012/07/09/parsing-large-files-with-apache-camel/


Thanks,

Kalyan


Apache Camel Interview Questions – Basics Part2

Hi,


This is continuation of my previous article.


Q) How many Messages can exist in an exchange?

A) Only one message.

Q) What are global and local routes in camel?

A) A local rule is a rule written inside <route> tags (in case of spring DSL). A global rule starts with a special processor type such as intercept(), exception(), or errorHandler().

A local rule always starts by defining a consumer endpoint, using from(“endPointURI”), and typically (but not always) ends by defining a producer endpoint using to(“endPointURI”).


Q) What is an event-driven consumer and a polling consumer?

A) “direct” component is an example of an event-driven consumer and file, ftp, etc are examples of a polling consumer. An event driven consumer responds for an event(action) whereas a polling consumer will keep on polling the source location for any messages.

Q) What are the message exchange patterns provided in camel?

A) The exchange object holds the message object which has a property attached to it called Message Exchange Pattern also referred to as MEP. To the end user, the exchange pattern is simply a way to identify the type of exchange object that we are dealing with.

InOnly (Fire and forget)

InOut (Request – Response)

Q) If we have multiple routes defined, what is the order in which these routes are  executed?

A) Camel routes are always executed in the order they are defined. Though this can be controlled by passing the attribute “startupOrder” to the camel:route tag in the spring.

Q) How do we start the execution of camel routes?

A) The execution can be started by loading the object of camel context (camel runtime or container) that contains all the routes. If it is a standalone application, an additional step of starting the camel context is required.

Q) How can we start and stop a single route at runtime?

A) camel context provides overloaded versions of the methods startRoute() and stopRoute() that can be used to start and stop routes at run time.

Q) Can we have two routes to read from the same file?

A) No. Camel does not allow to have more than one consumer endpoint trying to read from the same source location.

Q) Can we print the headers or properties of an exchange object in the camel route?

A) Yes. Camel supports various languages to write expressions and predicates in your routes. Some of the supported languages are Spel, XPath, XQuery, Tokenizer, etc. We can use Simple file language (simple) and spring expression language (Spel) in the route DSL to print the exchange information.


References:

http://camel.apache.org/architecture.html

http://bigdataconsultants.blogspot.in/2015/02/what-is-apache-camel.html


Thanks,

Kalyan

Apache Camel Interview Questions – Basics Part1

Hi,


Test your knowledge on Apache camel by answering the below basic yet important questions about Camel. These will be a series of articles wherein i will try to cover most of the basic aspects of camel that you will be asked or the questions you can ask to a person who is an expert in camel framework.


Q) What are routes in camel?

A) Routes are the building blocks in camel. Routes contain the routing logic or rules which specifies the source system to read the messages and the destination system which receives the messages.

Q) How do you define routes in camel?

A)  Routes can written using one of the DSL languages. The popular DSLs used are Java and Spring XML. Below is a snippet of defining the routes in Spring and Java DSL.

 Spring:
 <camel:route>
 <camel:from uri="...."></camel:from>
 <camel:to uri="..."></camel:to>
 </camel:route>
Java:
 public class MyRouteBuilder extends org.apache.camel.builder.RouteBuilder
 {
 public void configure() {
 
 from("...")
 .to("...");
 }
 }

Q) What is an endpoint?

A) A camel endpoint is similar to an entity that is capable of sending or receiving messages. For e.g., a JMS queue can be treated as an endpoint.

Q) What are components?

A) In simple terms, a component refers to an external entity that is communicating with camel. To write a camel route that work with files, file component is to be used. Similarly to work with JMS queue, jms component has to be used.

Ex – A FileComponent is referred to by file in a URI and it creates FileEndpoints.


Q) What is an URI?

A) URI is a naming scheme used in camel to refer to an endpoint. An URI tells camel, the component being used, the context path and the options applied against the component. URI contains 3 parts:

  • Scheme
  • Context path
  • Options

Example of a file URI working as a consumer –

 from("file:src/data?fileName=demo.txt&fileExist=Append");

Here the scheme points to file, the context path is “src/data” and the options are “fileName and fileExist” are options that can be used with file component or file endpoint.


Q) How is data passed between the routes?

A) The data is passed in the routes as an object of the class org.apache.camel.Exchange.


Q) How is a camel exchange created?

A) An exchange is created by the endpoint.


Q) What is a producer and a consumer endpoint?

A) A camel route is similar to a channel though which data flows. Producer and consumer are two endpoints that are present at each end of the channel.
A consumer endpoint is the starting point of the route. A definition of a camel route starts by writing a camel consumer endpoint.
A producer endpoint appears (not always) at the end of the route. It consumes the data that is passed through the route.


Q) What type of object(s) can the exchange hold?

A) A camel Exchange can hold any sub type of java.lang.Object including primitive data types.


Q) What is a camel context?

A) A camel context is a container in camel that holds the camel routes among many others. Everything written in a camel is contained within the camel container. At the core of this container is the routing engine that allows us to define and execute the routes.

Programatically, the container can be referenced using an object of type org.apache.camel.CamelContext.


Please feel free to provide your comments regarding the contents of this post.


References:

http://camel.apache.org/faq.html

http://stackoverflow.com/questions/tagged/apache-camel

http://www.ezdev.org/view/apache-camel/7165


Thanks,

Kalyan

Camel CXFRS and multiple @PathParam and @QueryParam arguments

Hi,

In this article, i will try to explain how to capture multiple @PathParam variables and the @QueryParam variables from your GET request. The code looks as below:

package com.examples.camel.cxf.rest.resource;

import javax.ws.rs.GET;
import javax.ws.rs.Path;
import javax.ws.rs.PathParam;
import javax.ws.rs.Produces;
import javax.ws.rs.QueryParam;
import javax.ws.rs.core.MediaType;
import javax.ws.rs.core.Response;
import javax.jws.WebService;

@Path("/employee")
@WebService
public interface EmployeeIntf {

	@GET
	@Path("/getdetails/{empname}/id/{empid}")
	@Produces(MediaType.TEXT_PLAIN)
	public Response getEmployeeCredentails(@PathParam("empname") String name,
			@PathParam("empid") String id,
			@QueryParam("dept") String department);
}

And the implementation class will go as follows:

package com.examples.camel.cxf.rest.resource;

import javax.ws.rs.core.Response;
import javax.ws.rs.core.Response.Status;

public class EmployeeResource implements EmployeeIntf {

	public Response getEmployeeCredentails(String name, String id,
			String department) {

		StringBuilder response = new StringBuilder();
		response.append("Name\t\t:\t" + name + "\n" +
				"Id\t\t:\t" + id + "\n" +
				"Department\t\t:\t" + department + "\n");

		//code to fetch employee credentials from DB

		response.append("\nYour Credentials are: \n");
		response.append("User Name\t:\t" + name + "_admin" + "\n" );
		response.append("Password\t:\t Welcome@123");

		return Response.status(Status.OK).entity(response.toString()).build();
	}
}

If you have already tried to do this you must have noticed that only the first argument of the method is passed with the input value where as the rest of the arguments receive a null value. Below is the output that you can see when
the request is made to the above URL.
default_cxfrs_output

While using cxfrs component as a consumer in camel route, When a request is made to the server the exchange body will be of type org.apache.cxf.message.MessageContentsList. In order to process the input data, you have two options:

Option – A

Use the @Header annotation provided by the camel APIs in the web service interface definition. The web service interface will look as below in this case:

public interface EmployeeIntf {
@GET
@Path("/getdetails/{empname}/id/{empid}")
@Produces(MediaType.TEXT_PLAIN)
public Response getEmployeeCredentails(String httpPath, String httpQuery);
}

And the corresponding implementation class will be as follows:

	public Response getEmployeeCredentails(@Header("CamelHttpPath") String httpPath,
			@Header("CamelHttpQuery") String httpQuery) {	

		String response = "Input Path is : " + httpPath
				+ "\nInput Query is : " + httpQuery;

		//parse the stringss httpPath and httpQuery and read the input data.
		return Response.status(Status.OK).entity(response.toString()).build();
	}

The output in this case will look as follows:
HeaderAnnotation_Output

As you can see the problem with this approach is that programmer has to manually parse the input URL and fetch the required data. This might be a cumbersome task and is not recommended.

Option – B

Another way to deal with this problem is to use @BeanParam annotation in the method.
1. Create a Bean that will contain the list of @PathParam and @QueryParam variables.
2. Modify the method signature of your resource and specify the bean as an input variable.

This way we can get rid of manually parsing the input request URL. The sample bean class i have created to store the details are:

public class EmployeeBeanParam {

	@PathParam("empname")
	private String name;
	@PathParam("empid")
	private String id;
	@QueryParam("department")
	private String department;

        //getters and setters 

        public String toString() {
		return "Emp Name : \t" + this.name + "\n" +
				"Emp ID : \t " + this.id + "\n" +
				"Department : \t" + this.department + "\n";
	}
}

With this, the interface definition will look as below:

@GET
	@Path("/getdetails/{empname}/id/{empid}")
	@Produces(MediaType.TEXT_PLAIN)
	public Response getEmployeeCredentails(@BeanParam EmployeeBeanParam empBeanParam);

And the corresponding implementation class looks like:

public Response getEmployeeCredentails(EmployeeBeanParam empBeanParam) {

		System.out.println("In empBeanParam.....the body obj is " + empBeanParam.equals(null));

		StringBuilder response = new StringBuilder();
		response.append("Name\t\t:\t" + empBeanParam.getName() + "\n" +
				"Id\t\t:\t" + empBeanParam.getId() + "\n" +
				"Department\t\t:\t" + empBeanParam.getDepartment() + "\n");

		//code to fetch employee credentials from a persistent storage

		response.append("\nYour Credentials are: \n");
		response.append("User Name\t:\t" + empBeanParam.getName() + "_admin" + "\n" );
		response.append("Password\t:\t Welcome@123");

		return Response.status(Status.OK).entity(response.toString()).build();
	}

Now in the camel route, simply use the camel’s converTo() method provided in the Java DSL to convert the input request to the type EmployeeBeanParam. Below is the complete code of the route implemented in spring DSL:

<beans xmlns="http://www.springframework.org/schema/beans"
       xmlns:xsi="http://www.w3.org/2001/XMLSchema-instance"
       xmlns:cxf="http://camel.apache.org/schema/cxf"
       xmlns:jaxrs="http://cxf.apache.org/jaxrs"
       xsi:schemaLocation="
       http://www.springframework.org/schema/beans
       http://www.springframework.org/schema/beans/spring-beans.xsd
       http://camel.apache.org/schema/cxf
       http://camel.apache.org/schema/cxf/camel-cxf.xsd
       http://cxf.apache.org/jaxrs
       http://cxf.apache.org/schemas/jaxrs.xsd
       http://camel.apache.org/schema/spring
       http://camel.apache.org/schema/spring/camel-spring.xsd
    ">
     <bean id="employeeResource" class="com.examples.camel.cxf.rest.resource.EmployeeResource" />

<cxf:rsServer id="myServer" address="/myapp" loggingFeatureEnabled="true">
     	<cxf:serviceBeans>
     		<ref bean="employeeResource" />
     	</cxf:serviceBeans>
     	<cxf:providers>
     		<bean class="org.codehaus.jackson.jaxrs.JacksonJsonProvider" />
     	</cxf:providers>
     </cxf:rsServer>

<camelContext id="context" xmlns="http://camel.apache.org/schema/spring">
    <route>
        <from uri="cxfrs:bean:myServer"/>
        <choice>
           <when>
                <simple>${header.operationName} == 'getEmployeeCredentails'</simple>
                <log message="[CAMEL-LOG-INFO]: Method invoked is ${header.operationName}"/>
                <to uri="direct:getEmpCredentials"/>
            </when>
        </choice>
    </route>
    <route>
        <from uri="direct:getEmpCredentials"/>
        <log message="Before converting the body type, Body is ***${body}***"/>
        <convertBodyTo type="com.examples.camel.beans.EmployeeBeanParam"/>
        <log message="After converting the body type, Body is ***${body}***"/>
        <bean ref="employeeResource" method="getEmployeeCredentails"/>
    </route>

</camelContext>
</beans>

Camel’s built-in data type converter (highlighted in line #40) will take care of converting the message type in exchange to the type EmployeeBeanParam before passing it to the service implementation method. The output returned in this case will look as follows:

BeanParam_Output

One other way to handle the problem is by using a custom bean / processor in between the route which will read the exchange object i.e., object of type org.apache.cxf.message.MessageContentsList which is of type ArrayList, iterate over the list and fetch the required content. This way of handling is helpful if you want to validate the URL and add more information before invoking the actual web service method.

To know on how to use the cxfrs component read my earlier blog – Using Apache Camel’s cxfrs component

If you find other ways of handling the REST requests which are easier from the ones listed above, kindly share. Hope this was helpful.

References:
https://dzone.com/articles/camel-cxf-service-multiple
http://stackoverflow.com/questions/19714684/jax-rs-and-camel-except-1st-queryparameter-all-others-are-null

Thanks,
Kalyan

REST web service using Apache Camel CXFRS component

Hi,


In this post, i will try to explain how to write a web service using Apache camel cxfrs component. It will be a simple Hello World web service that will accept a GET and a POST request and returns a plain text output for the GET request and json object for the POST request.

Following are the components used for this demo.

  1. Apache Camel Core
  2. Apache Camel CXFRS component
  3. Spring core, context, web, beans
  4. Jackson library – to handle JSON data
  5. Jetty server
  6. JBoss Server

1. Start by creating a maven project – Choose the archetype of webapp. The project structure will appear as follows:

camel-cxf-rs
|
|
— src
|
|
— main
|
|
— java (contains all java packages)
— resources – contains “camel-cxfrs-config.xml”
— webapp
|
|
— WEB-INF – contains “web.xml”

2. Add the dependencies for the components listed in #1 to #4 in your pom.xml file. The result will look as below.

<project xmlns="http://maven.apache.org/POM/4.0.0" xmlns:xsi="http://www.w3.org/2001/XMLSchema-instance"
  xsi:schemaLocation="http://maven.apache.org/POM/4.0.0 http://maven.apache.org/maven-v4_0_0.xsd">
  <modelVersion>4.0.0</modelVersion>
  <groupId>org.examples.camel.cxf.rest</groupId>
  <artifactId>camel-cxf-rest</artifactId>
  <packaging>war</packaging>
  <version>0.0.1-SNAPSHOT</version>
  <name>camel-cxf-rest Maven Webapp</name>
  <url>http://maven.apache.org</url>
  <properties>
        <project.build.sourceEncoding>UTF-8</project.build.sourceEncoding>
	<camelspring.version>2.13.2</camelspring.version>		
	<spring.version>3.2.10.RELEASE</spring.version>
  </properties>
  <dependencies>
         <!-- Camel Dependencies -->
         <dependency>
             <groupId>org.apache.camel</groupId>
             <artifactId>camel-core</artifactId>
             <version>${camelspring.version}</version>
         </dependency>
         <dependency>
             <groupId>org.apache.camel</groupId>
             <artifactId>camel-cxf</artifactId>
             <version>${camelspring.version}</version>
         </dependency>
         <!-- End of Camel Dependencies -->

          <!-- Spring Dependencies -->
         <dependency>
             <groupId>org.springframework</groupId>
             <artifactId>spring-core</artifactId>
             <version>${spring.version}</version>
         </dependency>
         <dependency>
             <groupId>org.springframework</groupId>
             <artifactId>spring-context</artifactId>
             <version>${spring.version}</version>
         </dependency>
         <dependency>
             <groupId>org.springframework</groupId>
             <artifactId>spring-context-support</artifactId>
             <version>${spring.version}</version>
         </dependency>
         <dependency>
             <groupId>org.springframework</groupId>
             <artifactId>spring-web</artifactId>
             <version>${spring.version}</version>
         </dependency>
         <dependency>
             <groupId>org.springframework</groupId>
             <artifactId>spring-beans</artifactId>
             <version>${spring.version}</version>
         </dependency>
         <!-- End of Spring dependencies -->

         <!-- Jackson dependencies -->
         <dependency>
             <groupId>org.codehaus.jackson</groupId>
             <artifactId>jackson-jaxrs</artifactId>
             <version>1.9.12</version>
         </dependency>
         <dependency>
             <groupId>org.codehaus.jackson</groupId>
             <artifactId>jackson-core-asl</artifactId>
             <version>1.9.12</version>
         </dependency>
         <!-- End of Jackson dependencies -->

         <!-- Jetty Server dependencies -->
         <dependency>
             <groupId>org.apache.cxf</groupId>
             <artifactId>cxf-rt-transports-http-jetty</artifactId>
             <version>2.7.11</version>
         </dependency>
         <!-- End of Jetty dependencies -->

</dependencies>

After adding the dependencies, start creating the required resources. First, we will start configuring the servlet which listens to the input HTML requests. This is configured in WEB-INF/web.xml file. The contents of the web.xml will look as below:

<web-app>
 <display-name>Apache Camel CXF Rest Web Application</display-name>
 <context-param>
    <param-name>contextConfigLocation</param-name>
    <param-value>classpath:camel-cxfrs-config.xml</param-value>
 </context-param>
 <servlet>
     <servlet-name>CXF Servlet</servlet-name>
     <servlet-class>org.apache.cxf.transport.servlet.CXFServlet</servlet-class>
 </servlet>
 <servlet-mapping>
     <servlet-name>CXF Servlet</servlet-name>
     <url-pattern>/webapi/*</url-pattern>
 </servlet-mapping>
 	<listener>
     	<listener-class>org.springframework.web.context.ContextLoaderListener</listener-class>
 </listener>
</web-app>

Now we will start by coding the java resources that will be used to handle the REST request. There will be an interface and an implementation class (Resource). The interface will specify the web service annotations and the implementation class is used to respond to the client requests. The interface will look as below:

package com.examples.camel.cxf.rest.resource;

import javax.ws.rs.GET;
import javax.ws.rs.POST;
import javax.ws.rs.Path;
import javax.ws.rs.Produces;
import javax.ws.rs.core.MediaType;
import javax.ws.rs.core.Response;
import javax.jws.WebService;

@Path("/hello")
@WebService
public interface HelloWorldIntf
{
   @GET
   @Path("/greet")
   @Produces(MediaType.TEXT_PLAIN)
   public Response greet();

   @POST
   @Path("/sayhello")
   @Produces(MediaType.APPLICATION_JSON)
   public Response sayHello(String input);
}

And below is the implementation class. Note that for the sake of convenience, i have written a ‘Hello’ class in the same file “HelloWorldResource.java”. You may wish to write this in a different file. An object of this class is returned to the POST request in JSON format.

Also note that the “sayHello” method which accepts a POST request does not have a @Consumes annotation. Reason being, you can send any of the content type with the resource URL and the sayHello method will get invoked. We will see two examples by passing TEXT_PLAIN & XML input and see the output in both the cases.

package com.examples.camel.cxf.rest.resource;

import javax.ws.rs.core.Response;
import javax.ws.rs.core.Response.Status;

public class HelloWorldResource implements HelloWorldIntf
{
    public Response greet() {

       return Response.status(Status.OK).
                 entity("Hi There!!").
                    build();
    }

    public Response sayHello(String input) {
       Hello hello = new Hello();
       hello.setHello("Hello");
       hello.setName("Default User");

        if(input != null)
           hello.setName(input);

       return Response.
                 status(Status.OK).
                   entity(hello).
                     build();
    }
}

class Hello {
   private String hello;
   private String name;

   public String getHello() { return hello; }
   public void setHello(String hello) { this.hello = hello; }

   public String getName() { return name; }
   public void setName(String name) { this.name = name; }
}


Finally, the most important item i.e., camel configuration. The camel configuration will declare the server using the jaxrs component. This will be listening to the incoming requests. This file is named as ‘camel-cxfrs-config.xml’

 <?xml version="1.0" encoding="UTF-8"?>
 <beans xmlns="http://www.springframework.org/schema/beans"
        xmlns:xsi="http://w3.org/2001/XMLSchema-instance"
        xmlns:cxf="http://camel.apache.org/schema/cxf"
        xmlns:jaxrs="http://cxf.apache.org/jaxrs"
        xsi:schemaLocation="
        http://www.springframework.org/schema/beans
        http://www.springframework.org/schema/beans/spring-beans.xsd
        http://camel.apache.org/schema/cxf
        http://camel.apache.org/schema/cxf/camel-cxf.xsd
        http://cxf.apache.org/jaxrs
        http://cxf.apache.org/schemas/jaxrs.xsd
        http://camel.apache.org/schema/spring
        http://camel.apache.org/schema/spring/camel-spring.xsd
 >

 <import resource="classpath:META-INF/cxf/cxf.xml" />
 <import resource="classpath:META-INF/cxf/cxf-servlet.xml" />

 <bean id="helloBean" class="com.examples.camel.cxf.rest.resource.HelloWorldResource" />

 <cxf:rsServer id="helloServer" address="/helloapp" loggingFeatureEnabled="true">
   <cxf:serviceBeans>
      <ref bean="helloBean" />
   </cxf:serviceBeans>
   <cxf:providers>
      <bean class="org.codehaus.jackson.jaxrs.JacksonJsonProvider" />
   </cxf:providers>
 </cxf:rsServer>

 <camelContext id="context" xmlns="http://camel.apache.org/schema/spring">
   <route>
     <from uri="cxfrs:bean:helloServer />
     <log message="Processing CXF route....http method ${header.CamelHttpMethod}" />
     <log message="Processing CXF route....path is ${header.CamelHttpPath}" />
     <log message="Processing CXF route....body is ${body}" />
     <choice>
       <when>
         <simple>${header.operationName} == 'sayHello'</simple>
         <to uri="direct:invokeSayHello" />
       </when>
       <when>
         <simple>${header.operationName} == 'greet'</simple>
         <to uri="direct:invokeGreet" />
       </when>
     </choice>
   </route>

   <route id="invokeSayHello">
      <from uri="direct:invokeSayHello" />
      <bean ref="helloBean" method="sayHello" />
   </route>
   <route id="invokeGreet">
      <from uri="direct:invokeGreet" />
      <bean ref="helloBean" method="greet" />
   </route>
 </camelContext>

 </beans>

The file is placed in src/main/resources. In the build path it is configured to point to the output directory target/classes. Run and deploy the war file – camel-cxf-rest.war in the server.

After the deployment, you can make requests from the browser with the below URL


GET Request

URL – http://localhost:8080/camel-cxf-rest/webapi/helloapp/hello/greet

Output:

Hi There!!!

In the server console log, you can see the below log message generated when the request is serviced.

14:02:22,057 INFO  [org.apache.cxf.interceptor.LoggingInInterceptor] (http-localhost/127.0.0.1:8080-5) Inbound Message
----------------------------
ID: 9
Address: http://localhost:8080/camel-cxf-rest/webapi/helloapp/hello/greet
Http-Method: GET
Content-Type: 
Headers: {Accept=[text/html,application/xhtml+xml,application/xml;q=0.9,image/webp,*/*;q=0.8], accept-encoding=[gzip, deflate, sdch], accept-language=[en-US,en;q=0.8], cache-control=[max-age=0], connection=[keep-alive], Content-Type=[null], host=[localhost:8080], user-agent=[Mozilla/5.0 (Windows NT 6.1) AppleWebKit/537.36 (KHTML, like Gecko) Chrome/43.0.2357.81 Safari/537.36]}
--------------------------------------
14:02:22,060 INFO  [route1] (http-localhost/127.0.0.1:8080-5) [CAMEL-LOG-INFO]: processing the CXF route.....method invoked is GET
14:02:22,060 INFO  [route1] (http-localhost/127.0.0.1:8080-5) [CAMEL-LOG-INFO]: processing the CXF route.....CamelHttpPath is /hello/greet
14:02:22,061 INFO  [route1] (http-localhost/127.0.0.1:8080-5) [CAMEL-LOG-INFO]: processing the CXF route.....CamelHttpQuery is 
14:02:22,062 INFO  [route1] (http-localhost/127.0.0.1:8080-5) [CAMEL-LOG-INFO]: processing the CXF route....body of the message is 
14:02:22,062 INFO  [route1] (http-localhost/127.0.0.1:8080-5) [CAMEL-LOG-INFO]: invoked method.....greet
14:02:22,065 INFO  [org.apache.cxf.interceptor.LoggingOutInterceptor] (http-localhost/127.0.0.1:8080-5) Outbound Message
---------------------------
ID: 9
Response-Code: 200
Content-Type: text/plain
Headers: {Content-Type=[text/plain], Date=[Tue, 21 Jul 2015 08:32:22 GMT]}
Payload: Hi There!!!
--------------------------------------


POST Request

URL – http://localhost:8080/camel-cxf-rest/webapi/helloapp/hello/sayhello

In request body, plain text is sent  – “James Gosling”

Output:

{

hello : “Hello”,

name: “James Gosling”

}

In the server console log, you will the below messages:

14:08:18,251 INFO  [org.apache.cxf.interceptor.LoggingInInterceptor] (http-localhost/127.0.0.1:8080-5) Inbound Message
----------------------------
ID: 1
Address: http://localhost:8080/camel-cxf-rest/webapi/helloapp/hello/sayhello
Encoding: ISO-8859-1
Http-Method: POST
Content-Type: application/xml
Headers: {Accept=[*/*], accept-encoding=[gzip, deflate], accept-language=[en-US,en;q=0.8], connection=[keep-alive], Content-Length=[14], content-type=[application/xml], csp=[active], host=[localhost:8080], origin=[chrome-extension://hgmloofddffdnphfgcellkdfbfbjeloo], user-agent=[Mozilla/5.0 (Windows NT 6.1) AppleWebKit/537.36 (KHTML, like Gecko) Chrome/43.0.2357.81 Safari/537.36]}
Payload: James Gosling

--------------------------------------
14:08:18,268 INFO  [route1] (http-localhost/127.0.0.1:8080-5) [CAMEL-LOG-INFO]: processing the CXF route.....method invoked is POST
14:08:18,270 INFO  [route1] (http-localhost/127.0.0.1:8080-5) [CAMEL-LOG-INFO]: processing the CXF route.....CamelHttpPath is /hello/sayhello
14:08:18,270 INFO  [route1] (http-localhost/127.0.0.1:8080-5) [CAMEL-LOG-INFO]: processing the CXF route.....CamelHttpQuery is 
14:08:18,270 INFO  [route1] (http-localhost/127.0.0.1:8080-5) [CAMEL-LOG-INFO]: processing the CXF route....body of the message is James Gosling

14:08:18,275 INFO  [route1] (http-localhost/127.0.0.1:8080-5) [CAMEL-LOG=INFO]: invoked method....sayHello
14:08:18,586 INFO  [org.apache.cxf.interceptor.LoggingOutInterceptor] (http-localhost/127.0.0.1:8080-5) Outbound Message
---------------------------
ID: 1
Response-Code: 200
Content-Type: application/json
Headers: {Content-Type=[application/json], Date=[Tue, 21 Jul 2015 08:38:18 GMT]}
Payload: {"hello":"Hello","name":"James Gosling\n"}
--------------------------------------


Now make another POST request with the XML input as the body or request payload.

URL – http://localhost:8080/camel-cxf-rest/webapi/helloapp/hello/sayhello

Request Body – 

<employee>

<name>James Gosling</name>

<department>Computers</department>

</employee>

Output:

{

“hello”:”Hello”,

“name”:”<employee>\n <name>James Gosling</name>\n <department>Computers</department>\n</employee>”

}


And that is all you require to write a REST web service using cxfrs component.

Before we finish, few points i would like to share with you all.

1. The declaration of the <cxf:rsServer> alone will not initialize the org.apache.cxf.endpoint.ServerImpl, when a route is written with either ‘from’ or ‘to’ using the cxfrs component, then the server’s publish address will be set to the address provided in the <cxf:rsServer> tag.


2. The code example of REST service provided in the book “Camel in Action” also works fine but it requires <jaxrs:server>, <cxf:rsServer> and <cxf:rsClient> tags to be present in the configuraiton xml file. Additionally, we require two different ports to serve the request. One port (say 8085) is used by the jaxrs server and the second port (say 8086) is used by the cxf:rsServer.

In such a scenario, if a valid request is sent to address published in <jaxrs:server>, client will receive a response but your route is not executed. And if the request is sent to the address published in <cxf:rsServer> then your route will be executed. In my next post, i will elaborate more on this and try to explain why we require both and .

For configuration, refer to the below link:

http://camel.apache.org/cxfrs.html


3. The actual resource class in your web service that points to a valid URL is never executed when the request is received initially. The web service class has to be referred somewhere in the route as a bean i.e., declare your web service class as a bean and use the bean in the ‘to’ section in your route.


In my next post, i will try to explain how to make a GET request that will take multiple PathParam’s and QueryParam’s from the input and return a response. Kindly provide your feedback if you find this post useful and any ideas (code examples, not just ideas) to implement this in a better way.


References:
https://github.com/arunma/osgicxfcamelmultiparams
http://www.consulting-notes.com/2010/12/basic-rest-service-in-apache-cxf-vs.html
https://access.redhat.com/documentation/en-US/Red_Hat_JBoss_Fuse/6.0/html/EIP_Component_Reference/files/_IDU_CXFRS.html

Thanks,

Kalyan


Installing and creating your first Maven Project in windows

Hi,

In this article today, we will see how to configure Maven in your windows machine and start using it.

1. Have the Maven installed in your PC. You can get the jar file from the apache site. Download the zip file and extract it to a folder e.g, D:\apache maven\apache-maven-3.2.2. Going forward, this path will be referred as maven installation directory.

2. Create environment variables that point to your maven installation. As in,

MAVEN_HOME=D:\apache maven\apache-maven-3.2.2
M2_HOME=D:\apache maven\apache-maven-3.2.2

In this article, mykong explains why we need to set up two variables. Along with this, ensure that JAVA_HOME is set to the right installation directory in your machine.

http://www.mkyong.com/maven/how-to-install-maven-in-windows/

3. Now go the path %MAVEN_HOME%/conf/ and open the file settings.xml. The %MAVEN_HOME% is your maven installation directory.

4. The xml tags present in the settings.xml file are empty with no values. We need edit the file and put some valid tags in order for maven installation to work. A sample edited file looks like below:

<?xml version=”1.0″ encoding=”UTF-8″?>
<settings xmlns=”http://maven.apache.org/SETTINGS/1.0.0&#8243;
xmlns:xsi=”http://www.w3.org/2001/XMLSchema-instance&#8221;
xsi:schemaLocation=”http://maven.apache.org/SETTINGS/1.0.0 http://maven.apache.org/xsd/settings-1.0.0.xsd”&gt;
<localRepository>${user.home}/.m2/repository</localRepository>
<interactiveMode>true</interactiveMode>
<offline>false</offline>
<pluginGroups></pluginGroups>
<proxies>
<proxy>
<active>true</active>
<protocol>http</protocol>
<host>A.B.C.D</host>
<port>80</port>
<nonProxyHosts>toople*|*docs</nonProxyHosts>
</proxy>
</proxies>
<servers></servers>
<mirrors></mirrors>
<profiles>
<profile>
<id>mavenProfile</id>
<repositories>
<repository>
<id>jboss-public-repository-group</id>
<name>JBoss Public Maven Repository Group</name>
<url>https://repository.jboss.org/nexus/context/groups/public-jboss</url&gt;
<layout>default</layout>
<releases>
<enabled>true</enabled>
<updatePolicy>never</updatePolicy>
</releases>
</repository>
<repositories>
<pluginRepositories>
<pluginRepository>
<id>jboss-public-repository-group</id>
<name>JBoss Public Maven Repository Group</name>
<url>https://repository.jboss.org/nexus/content/groups/public-jboss/</url&gt;
<layout>default</layout>
<releases>
<enabled>true</enabled>
<updatePolicy>never</updatePolicy>
</releases>
<snapshots>
<enabled>true</enabled>
<updatePolicy>never</updatePolicy>
</snapshots>
</pluginRepository>
<pluginRepositories>
</profile>
</profiles>
</settings>

As you can see, the required tags are added to the settings.xml file. The value of the proxy server is given as A.B.C.D due to security reasons. In some situations you will be required to add the tags <username> and <password>, as it depends on the way your PC connects to the network. The value in the localRepository tag refers to a path in
your PC. It will be pointing to “C:\Users\<Your_Login_Name>\.m2\repository\”. While using maven against any specific goals or plugins, maven will check if the relevant jars needed to complete the execution are present in the above path. If not, it will fetch the details from the repository location and copies them into the above path.

5. Now, create a top level directory which will hold all the maven projects. E.g., D:\Maven_Projects

6. Open the command prompt window and navigate to the newly created directory path and run the below command.

mvn archetype:generate -DgroupId=com.mycompany.app -DartifactId=my-app -DarchetypeArtifactId=maven-archetype-quickstart -DInteractiveMode=false

7. If all the previous steps are successfully preformed, the above command will finish successfully and you should be able to see new directory structure created with a file named App.java which is your Hello World file.

8. Now package the content into a jar file using the below command. On successful completion, we shall see a new jar file created under my-app\target\my-app-1.0-SNAPSHOT.jar

mvn package

9. Run the program using the below java command.

java -cp target/my-app-1.0-SNAPSHOT.jar com.mycompany.app.App

which produces the follwowing output:

Hello World!

This concludes that your maven installation is working fine and you can start of by creating maven projects.

Thanks,

Kalyan

Starting your HelloWorld in Apache Camel using windows command prompt

Hi,

If you are starting your journey into apache camel, then this article might help you to write a simple camel program in notepad and execute it. The program is written using Java DSL and exeucted in windows command prompt. Before we start, there are 2 pre-requisites that need to be followed.

Pre-requisite:

1. Camel core jar of any version. (For the demo i am using the version 2.15.1)

2. slf4j jar

Task:

We are going to perform a simple file movement task from one windows folder to another. All the files present within the folder will be moved when the program is executed.

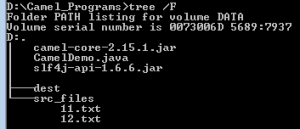
1. Create a directory in your windows system as shown below. We will take the directory src_files as the source directory from where we will copy the files into dest directory.

dir structure
Initial directory structure

2. For simplicity, i have put the jar file(s) and the java source file within the same folder.

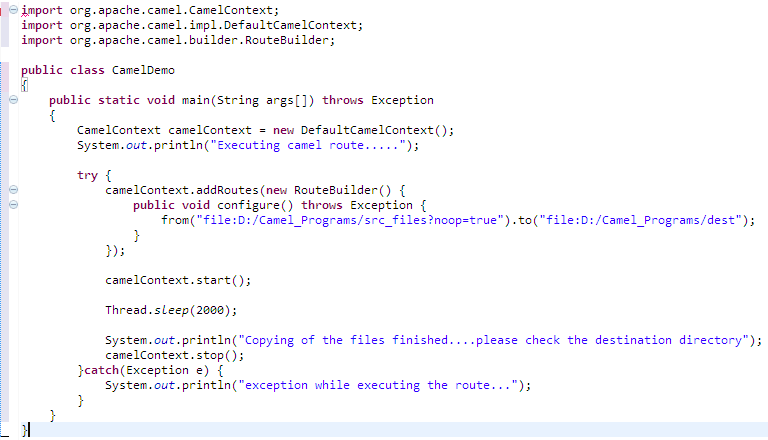
3. Start coding your program as shown below.

program

4. Compile the java file as shown below. If everything went fine, the compiler will return successfully.

javac -cp camel-core-2.15.1.jar CamelDemo.java

5. Run the java program as,

java -cp .;camel-core-2.15.1.jar;slf4j-api-1.6.6.jar CamelDemo

This will produce the output as shown below:

Executing camel route…..
Copying of the files finished….please check the destination directory

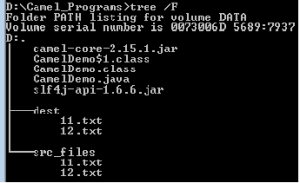
6. That’s it. You have successfully executed your first camel route and you can verify the files in the directory as,

output dir structure

As you can see the files 11.txt and 12.txt are copied into the dest folder and the route got finished successfully.

Take Away from the exercise:

1. The input URI used in this example is “file:D:/Camel_Programs/src_files?noop=true”.

2. An Endpoint is configured using an URI.

3. When the program was run, Camel internally used utility classes (e.g., GenericFileComponent, etc) to copy the files from one location to another location.

4. When changes are to be made to a route, Spring DSL is preferred when compared to Java DSL since modifications to the routes can easily be done in the spring XML file.

For further readings, please refer to the Camel’s official website.

http://camel.apache.org/

Thanks,

Kalyan

Reference Variable casting in Java

Hi,

In this article today, I will try to explain the types of casting allowed in java and the reasons why we face the java.lang.ClassCastException during runtime and how it is bypassed during compile time.

Before we start, let us understand two important points:

1. A reference type of parent class can point to an object of child class but the reverse is not true i.e., a reference of child type cannot point to an object of parent type.

class Animal { …. }

class Dog extends Animal { …. }

Animal animal = new Dog(); //Works fine because Dog IS-A Animal

Dog dog = new Animal(); //Not allowed by compiler because Animal IS-A //Dog is not true

2. When reading the below line:

Type1 reference = new Type2();

If the above syntax is valid, read it from right-to-left i.e., the relation between the two types here can be mentioned as “Type2 IS-A Type1” which means anything that can be performed using object of Type1 can be replaced with an object of Type2.

Downcasting:

Now coming to casting, java allows a variable to be casted to the type of a sub-class (downcasting) or to the type of a super-class (upcasting) but there are scenarios where this will lead to run-time exception.

Example for Downcasting: Consider we have the below hierarchy tree

class Animal { void animalBehavior() { …. } }

class Dog extends Animal { void dogBehavior() { …. } }

Now look at the below two scenarios.

Scenario-1

Animal animal = new Dog();

Dog dog = (Dog) Animal;

dog.dogBehavior();
Scenario-2

Animal animal = new Animal();

Dog dog = (Dog) animal;

dog.dogBehavior();

When we try to compile and run the above two scenarios, scenario-1 works fine whereas scenario-2 fails during run-time.

Q) How did the two scenarios compile fine without compiler reporting any error? (considering the #1 discussed in the introduction)

A) The answer is given by the compiler. When the above scenarios are compiled, all the compiler checks is that whether the two types (Animal & Dog) fall in the same inheritance tree. Since they do appear in the same inheritance tree, compiler did not say anything. The two types can appear in the inheritance tree in either way, it doesn’t matter to the compiler.

Q) Why did scenario-2 fail during run-time?

A) The answer is explained in #1 and #2 scenarios above. A child reference cannot point to an object of the parent type and if we infer what we are doing in scenario-2, we will come to the statement that “Animal IS-A Dog” which is not true i.e., Animal object cannot do everything that can be done by an object of Dog.

Upcasting:

Unlike downcasting, upcasting which is casting up the inheritance tree works implicitly. When you upcast, you are restricting the number of methos you can invoke as opposed to downcasting.

Dog dog = new Dog();

Animal animal = dog; //no explicit cast, works by default

Animal animal = (Animal) dog; //explicit cast 

animal.animalBehavior();

Points to Note:

  1. Casting only works when the casted object follows an “IS-A” relationship to the type you are trying to cast to.
  2. If the compiler knows for certainity that the cast does not work, it will report a compilation error as “inconvertible types”.

References:

https://www.ibm.com/developerworks/community/blogs/738b7897-cd38-4f24-9f05-48dd69116837/entry/classcastexception_reason_and_resolution2?lang=en

The reality of Checked v/s Unchecked exceptions in Java

Hi,

I actually did not want to write an article about this topic due to the in-numerous no of posts that we can find in the internet but what motivated me to write down is that i have noticed all the links give almost the same meaning to the end user.

“A checked exception is performed at compile-time and is required to have a try/catch or a throws block in a method.
An unchecked exception is derived from RunTimeException class and is not required to be coded in a try/catch or throws block.”


Well, there is nothing wrong in these explanations; they are perfectly valid. But the interesting stuff here is while developing an application which one you should go for? Unless you have a clear understanding of the two types of exceptions you cannot make this choice. The Sun’s documentation page provides below answer for this question:

“If a client can reasonably be expected to recover from an exception, make it a checked exception. If a client cannot do anything to recover from the exception, make it an unchecked exception.”


In my opinion we can write code to recover from any kind of exception. 🙂 Nah…i am just trying to be optimistic. For some exceptions we cannot do anything like – no memory left, no disk space left, etc. But my point being is that we can have code to check for null values, array index values, file availability, DB connection availability, etc i.e., we can handle almost all kinds of exceptions. Although the end result is that your application size would be of a greater size than what you have assumed but that is another story of discussion.


Let’s see what is a checked and an unchecked exception with an example.

Checked exception –
A check for a resource is called a checked exception. This check is performed by the compiler. For e.g., check for a file, connect to a DB, start a thread, etc. Compiler does not literally checks for the resource during compilation but it expects that you have corresponding piece of code (try/catch) in your application to handle the resource unavailability.

Unchecked exception –
A problem faced by the JVM during the execution of your program i.e, due to wrong values in the variables of an object – NumberFormatException, Array index out of bounds exception, etc.


Let us understand this more with an example. Below is a task for which you are requested to write code with proper exception handling. Assume that the functionality given in each of the below is written inside a different method.

  1. Create and start 5 threads.
  2. In the file system, each thread should locate a particular file.
  3. Open the file and read its contents into a List or an array. (For simplicity, we assume the file contains integer numbers)
  4. Loop the array and print the file contents i.e., integer values.


The below explains which of the two types of exception handlers you should use.

  • The functionality in #1 requires you to write “thread.start()” which means you have created a new thread and starting it. To java this means, the new thread is a resource for which it will create stack, registers, memory segment, etc. It is a fact that resources may not be available in real-world situations. So compiler enforces the programmer that he/she has extra code written in place to handle this situation and hence this is a compile-time checking i.e, you have to write a checked exception for #1.
  • In #2, the thread will locate a file in the file system. Again we are talking about a resource which is a file and hence you are forced to write a checked exception.
  • In #3, it again is dealing with resources; a checked exception is required
  • In #4, while looping over the values of the array/list, there is a possibility that your code might loop beyond the array’s limit. Even though the syntax may be correct, this kind of problem is something related to the way program has been written i.e., the way you are handling the code. This kind of a problem cannot be anticipated by the compiler. Hence you need to write an un-checked exception for #4.

“While developing custom exception handlers, use checked exceptions to check for resources existence/non-existence and unchecked exceptions to check variables (to be more specific values inside the variables)”


If you have more real-world examples please do share and provide your comments. Kindly refer the following links for more information about this topic.

http://tutorials.jenkov.com/java-exception-handling/checked-or-unchecked-exceptions.html

http://docs.oracle.com/javase/tutorial/essential/exceptions/runtime.html


Thanks a lot!